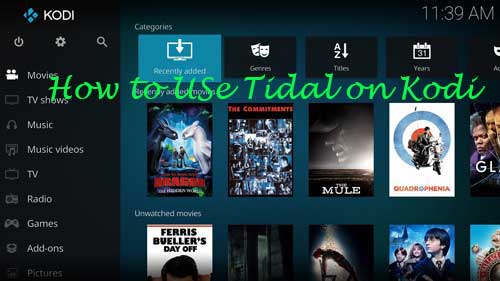
Kodi is a free and open-source media player software. It can work with multiple operating systems and hardware platforms. With it, users can play and browse streaming media files from the Internet and other local media files. Besides, Kodi supports online music streaming services. They include Amazon Prime Instant Video, Pandora, Rhapsody, Spotify and YouTube. Yet, there are still some music services not included, such as Tidal.
View also: Top 5 Tidal Music Player
So, now there is no Kodi Tidal cooperation. In this case, you can't enjoy Tidal music on Kodi with ease. But if you are looking for a way to listen to Tidal songs on Kodi, then you could refer to the post below. In this post, we are going to show you the tips on how to use Tidal on Kodi. Now, follow us and check them out in detail!
Part 1. How to Make Kodi Tidal Connect - Best Tool
To play Tidal on Kodi, you should learn the fact that Tidal music files are encrypted. And they are in FLAC and AAC audio format and can only be played on the Tidal app. While Kodi is compatible with audio file formats, like MP3, M4A, OGG, and more. Thus, if you want to connect Tidal Kodi, you need to change the audio formats for Tidal music files first.
Now, let's meet the best tool to help you get Tidal for Kodi. It is DRmare Tidal Music Converter. It can download and convert tracks, albums, playlists and other content from Tidal to your local music library. And it can convert Tidal to AAC, MP3, M4A, and so on without any quality loss.
Also, you can customize other audio parameters for Tidal music, such as bit rate, sample rate, channel and more. And this tool can run fast and save full ID3 tags of Tidal music tracks for you. In this way, you can easily get and enjoy Tidal songs on Kodi and other devices offline.

- Specializing in downloading Tidal audio to local audio files
- Convert Tidal to MP3, FLAC, WAV, AAC and other audio formats
- Adjust output audio quality and parameters for Tidal files
- Run at 5X faster speed, batch converting Tidal audio tracks
How to Convert Tidal for Kodi: Step-by-step Tutorial
With the classic and intuitive interface, DRmare Tidal Music Converter is easy to operate. Below you can see the detailed steps on how to use it to convert Tidal to Kodi-supported audio formats.
- Step 1Import Tidal audio to DRmare
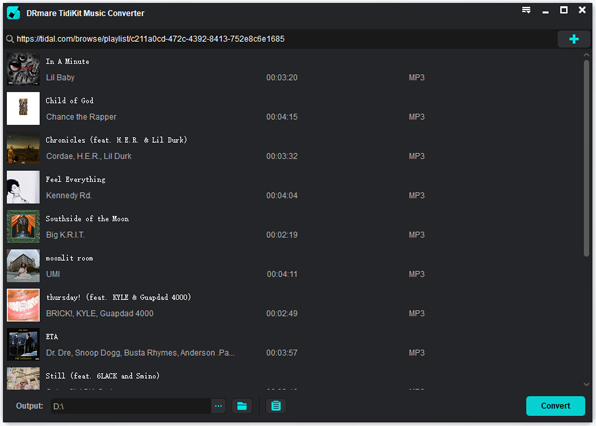
- Please install the DRmare Tidal Music Downloader on your computer, then open it. The Tidal app will open at the same time. Find your favorite music tracks in the Tidal app and touch the '...' icon next to the track you favor. Next, copy the link of the track and paste it to the search bar in the DRmare program. Then hit the '+' button to add Tidal music track to DRmare.
- Step 2Edit output settings for Tidal Kodi
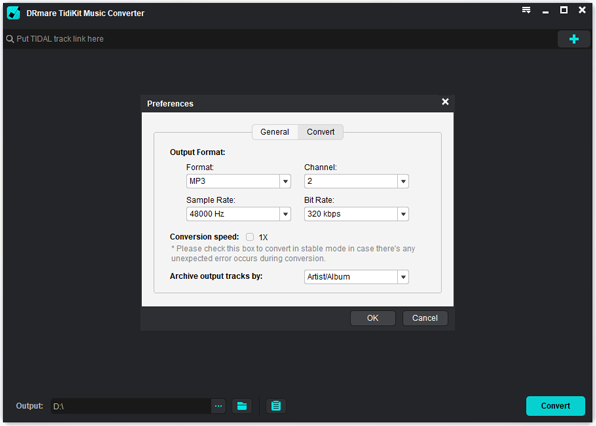
- Press on the Menu icon on the Windows version of DRmare and find the 'DRmare Tidal Music Converter' on the menu of your Mac computer. Then click the 'Preferences' > 'Convert' to begin to adjust the output audio settings for Kodi. You could customize the audio format, channel, sample rate, bit rate, and more according to your needs.
- Step 3Convert Tidal to Kodi
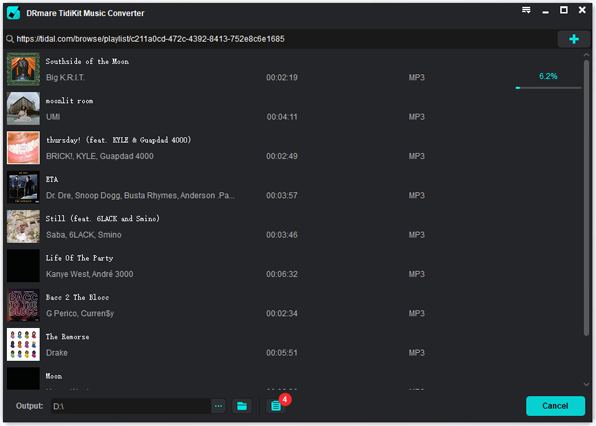
- Now touch the 'Convert' button on the bottom right of the DRmare main interface. Then the conversion will begin. When it is completed, you could hit on the 'Converted' button with a red spot to check the converted Tidal audio files on your computer.
How to Use Tidal on Kodi
At last, you can add Tidal to Kodi for playing. Please follow the simple steps below to see how to transfer Tidal files to Kodi and enjoy Tidal music on Kodi. Before starting, please sync the converted Tidal music files to your Android or other devices in advance.
Step 1. Launch the Kodi app on your Linux, iOS or Android devices.
Step 2. Click on the 'Music' tab on the left side of Kodi main interface. Then press on 'Enter files section'.
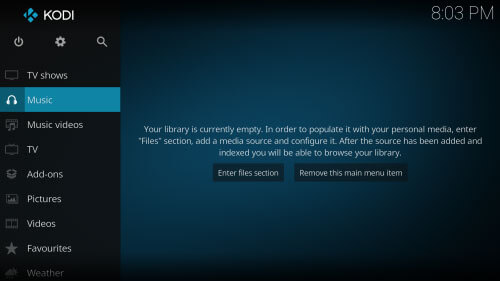
Step 3. It will guide you to the file selection window. Please choose the converted Tidal music files and click 'OK'.
Step 4. Next, you need to agree to import your media source to Kodi library and then wait for the files to be uploaded.
Step 5. Once finished, you can see Tidal music tracks on Kodi and you can play Tidal on Kodi without any limits.
Part 2. How to Get Tidal for Kodi via Tidal Kodi Addon
Besides using DRmare Tidal Converter, there is another way for you to listen to Tidal music on Kodi. You could install Kodi Tidal plugin to enjoy your music on Kodi. Now, please follow the easy guide below to learn how to install Tidal add-on on your Kodi.
Step 1. Start the Kodi program on your device.
Step 2. Click on the 'settings' icon at the left panel on the screen.
Step 3. At the new screen, find the 'Add-ons' option and hit on it.
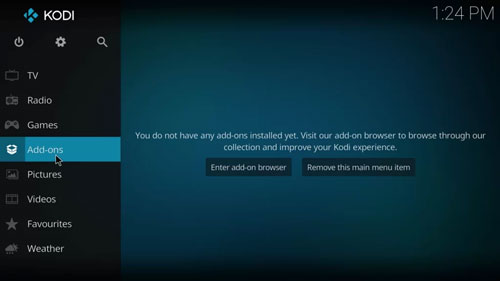
Step 4. Hit on the 'Package Installer' icon from the upper-left corner.
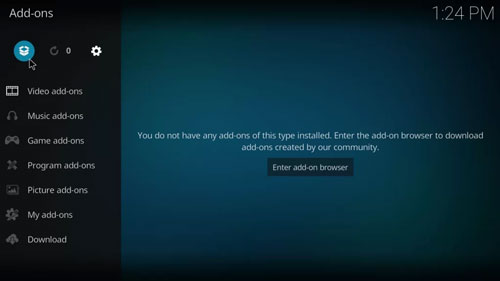
Step 5. Go to the 'Install from the repository' option.
Step 6. Then touch the 'Kodi add-on repository' option. Next, pick up 'Music add-ons' from the list.
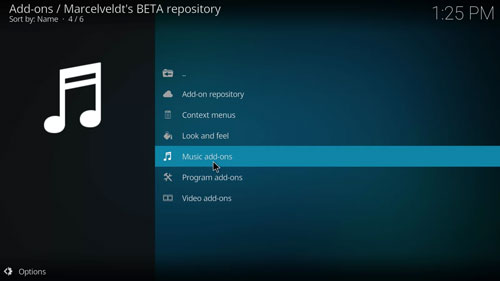
Step 7. Now, scroll down and choose the Tidal plugin.
Step 8. Touch the 'Install' button to install Tidal on Kodi.
Step 9. Once installed, you can open the Tidal addon on Kodi and log in with your Tidal account.
At last, you can start to listen to millions of tracks from Tidal in Kodi. You can even access Kodi Tidal MQA if you are a Tidal HiFi Plus subscriber.
For a detailed tutorial, please refer to the page: https://kodi.wiki/view/Add-on_manager
Part 3. In Conclusion
Here are two methods for you to connect Tidal Kodi. One is to install Tidal plugin in Kodi, the other is to use DRmare Tidal Music Converter. Yet, here we'd like to recommend the second way. It is stable and easy for you to enjoy Tidal music on Kodi. With this program, you can download songs from Tidal to local files on your computer. Then you can move Tidal audio files to Kodi for playing offline. Also, you can put Tidal music on other devices and platforms for listening without a Tidal account.


User Comments
Leave a Comment