The Raspberry Pi, a versatile and affordable mini-computer, can easily transform into your personal music hub, streaming your favorite Spotify playlists. Whether you're looking to install Spotify on Raspberry Pi directly or explore alternative methods to play Spotify on Raspberry Pi, there are multiple options available, each with its own pros and cons. Let's explore these methods, including how to play Spotify on Raspberry Pi via Spotify Connect and offline playback options, and discover the ideal solution for seamless Spotify enjoyment on your device.

Method 1: Play Spotify on Raspberry Pi with Raspotify
Raspotify is a lightweight Spotify client specifically designed for the Raspberry Pi. It seamlessly integrates with Spotify Connect, allowing you to control playback from any Spotify app on your network, making it a convenient way to play Spotify on your Raspberry Pi.
How to Play Spotify on Raspberry Pi with Raspotify
To set up Raspotify on your Raspberry Pi, follow these steps:
Step 1. Update Your Raspberry Pi's Operating System: Ensure your Raspberry Pi is running the latest version of Raspbian.
Step 2. Install Dependencies: Install the "curl" and "apt-transport-https" packages using the following commands:
sudo apt-get update
sudo apt-get install curl apt-transport-https
Step 3. Add Raspotify GPG Key and Repository: Add the Raspotify GPG key and repository to your system using the following commands:
sudo curl -fsSL https://raw.githubusercontent.com/raspi-spotify/raspotify/master/install/raspotify.gpg | sudo apt-key add -
sudo add-apt-repository https://raw.githubusercontent.com/raspi-spotify/raspotify/master/install/raspotify.list
Step 4. Install Raspotify: Update your package list and install Raspotify using the following commands:
sudo apt-get update
sudo apt-get install raspotify
Step 5. Connect to Spotify: Once Raspotify is installed, you can connect to your Raspberry Pi's Spotify software by opening the Spotify app on a chosen device and selecting it from the "Connect to a device" menu.
Tips:
Audio Output: For better sound quality, consider connecting your Raspberry Pi to external speakers or headphones.
Customization: You can customize Raspotify's behavior by editing the configuration file located at “/etc/raspotify.conf”.
Pros and cons of using Raspotify to play Spotify on Raspberry Pi
Pros
 Official Support: Raspotify is officially supported by Spotify, ensuring compatibility and stability.
 Easy Setup: Installation and configuration are relatively straightforward.
 Gapless Playback: Enjoy uninterrupted music transitions between tracks.
Cons
 Requires Spotify Premium: You need a Spotify Premium subscription to use Raspotify.
 Limited Features: Raspotify focuses on core playback functionality and lacks advanced features found in some third-party players.
Method 2: Play Spotify on Raspberry Pi with Spotifyd
Spotifyd is a versatile and customizable solution for turning your Raspberry Pi into a Spotify Connect device. It offers a wider range of features and personalization options compared to Raspotify, making it appealing to users seeking a more tailored audio streaming experience when they play Spotify on their Raspberry Pi.
How to Play Spotify on Raspberry Pi with Spotifyd
Step 1. Install Spotifyd: Install Spotifyd by executing the following commands in your Raspberry Pi's terminal:
curl -sSL https://raw.githubusercontent.com/Spotifyd/spotifyd/master/install.sh | sh
Step 2. Configure Audio Settings: Create a configuration file (/etc/spotifyd.conf) to specify your preferred audio device and bitrate. Here's an example configuration:
[global]
device = "hw:0,0" # Replace with your audio device
bitrate = 320 # Adjust the bitrate as desired
Step 3. Enable Background Running: To ensure Spotifyd starts automatically when your Raspberry Pi boots up, execute the following command:
sudo systemctl enable spotifyd
Sep 4. Connect to Spotify: Once Spotifyd is running, open the Spotify app on your phone or computer, select your Raspberry Pi from the "Connect to a device" menu, and start streaming your favorite music.
Tips:
Discover Audio Devices: Use the aplay -l command to list available audio devices on your Raspberry Pi.
Explore Configuration Options: The Spotifyd configuration file offers a variety of settings to customize your experience. Refer to the Spotifyd documentation for more details.
Pros and cons of using Spotifyd to play Spotify on Raspberry Pi
Pros
 Advanced Features: Spotifyd offers features like crossfading, audio normalization, and support for multiple audio outputs.
 Customization: Fine-tune various settings such as audio device preferences and bitrate.
 Community Support: A vibrant community offers support and resources.
Cons
 Requires Spotify Premium: Like Raspotify, Spotifyd also requires a Spotify Premium subscription.
 Steeper Learning Curve: The configuration process might be slightly more complex than Raspotify.
Install Spotifyd on a Raspberry Pi
Method 3: Play Spotify on Raspberry Pi Offline with DRmare
While Spotify Connect offers seamless streaming, it relies on a stable internet connection. For those times when you're offline, traveling, or in areas with limited connectivity, DRmare Spotify Music Converter offers the perfect solution for how to play Spotify on your Raspberry Pi. It empowers you to download and convert your favorite Spotify tracks, albums, and playlists into common audio formats, granting you the freedom to enjoy your music collection anytime, anywhere, even without an internet connection.

- Convert Spotify tracks to MP3, WAV, AAC, FLAC, and more for offline use.
- Works with both free and premium Spotify accounts, offering flexibility to all users.
- Keep original audio quality and organize music by album or artist.
- Batch conversion saves time by converting multiple songs or playlists in one go.
How to Play Spotify on Raspberry Pi with DRmare
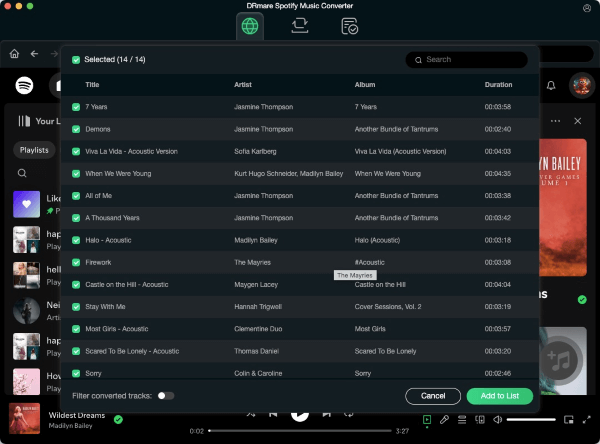
- Step 1Load Spotify music files to the software

Install DRmare Spotify Music Converter on your computer and launch it. The software will automatically open your Spotify app. Select the desired songs or playlists in Spotify and drag them to DRmare's interface. Alternatively, paste Spotify track links into the search box to add music files.
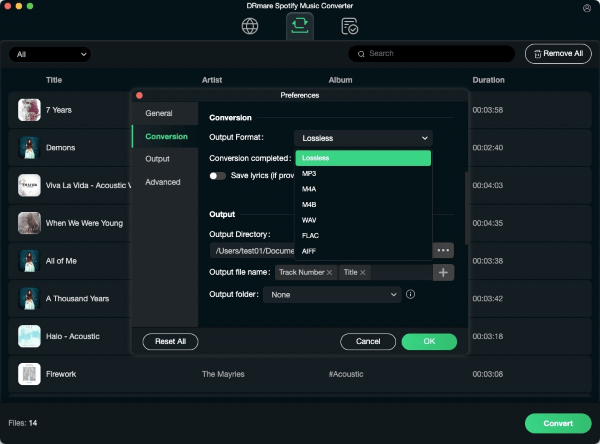
- Step 2Select and adjust the output formats and other parameters

After adding music files to DRmare, click the menu bar in the upper right and choose "Preferences" to adjust output settings. Here, you can select MP3 or other formats, and customize bit rate and channel parameters.
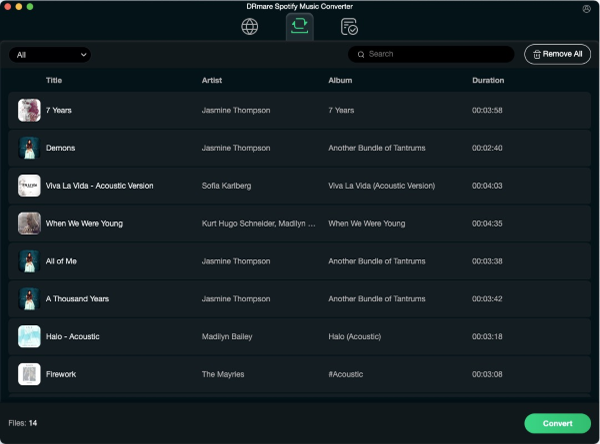
- Step 3Download and convert Spotify music to MP3

After configuring settings, click "Convert" to start the process. The conversion begins instantly and typically completes within seconds, processing all added music files.
- Step 4Transfer converted Spotify music to Raspberry Pi

Once the conversion is complete, locate the converted files on your computer and transfer them to your Raspberry Pi with SD card. You can then freely play and enjoy your Spotify music tracks on your Raspberry Pi, even without an internet connection.
Pros and cons of using DRmare to play Spotify on Raspberry Pi
Pros
 Offline Playback: Convert Spotify music to popular formats like MP3, FLAC, WAV, and more.
 No Premium Required: Works with both free and premium Spotify accounts.
 High-Quality Audio: Preserve the original audio quality and metadata during the conversion process.
 Batch Conversion: Efficiently convert multiple songs, playlists, or even entire albums at once.
 User-Friendly Interface: The intuitive interface makes it easy to use.
Cons
 Additional Software: Requires installing and using DRmare Spotify Music Converter on your computer.
 Conversion Time: The conversion process takes time, depending on the number of songs and your computer's processing power.
In Conclusion
The best method for you depends on your needs and preferences. If you have a Spotify Premium subscription and prioritize simplicity, Raspotify is a great choice. For advanced features and customization, Spotifyd is worth considering. If offline playback is essential, DRmare Spotify Music Converter provides the flexibility to enjoy your Spotify music anytime, anywhere.
No matter which method you choose, your Raspberry Pi can become the heart of your Spotify listening experience, delivering high-quality music throughout your home.


User Comments
Leave a Comment