


Hey there! Are you tired of the bland, default Spotify interface? Want to jazz it up with some cool themes and customizations? Look no further than Spicetify! This powerful customization tool lets you transform Spotify with stunning themes, ad-blocking capabilities, and lyric displays with an elegant user interface, etc. I 've tested the whole installation process myself, and it's super easy. In this tutorial, I will walk you through how to install and set up Spicetify step by step, So without further ado, let"s dive in!
Part 1. What is Spicetify?
YouTube Video: How to Customize Your Spotify Client with Spicetify
Before we get our hands dirty, let’s take a quick look at what Spicetify actually is. Spicetify is an open-source and cross-platform tool that lets you tweak the Spotify client on Windows, macOS, and Linux. Whether you want to change the theme, add new functionalities, or even some tweaks to bypass limitations set on Spotify free users, Spicetify has you covered.
Key Features of Spicetify
To help you better understand how it works, let‘s take a brief look at the main components of Spicetify.
1. Themes: Make Spotify truly yours with personalized and colorful schemes.
2. Extensions: Generally some simple scripts to add extra small features and improve functionality.
3. Apps: Relatively big changes, adding a completely new feature to your Spotify Client.
Spicetify is a GitHub project, this is Spicetify’s official GitHub Page. They also created an exclusive page to help users easily install Spicetify: https://spicetify.app/docs/advanced-usage/installation.
Although Spicetify is a cross-platform tool, in the following part, I'll mainly demonstrate how to download and install it on Windows. The process should be similar on macOS and Linux. If you encounter any problems while installing Spicetify on these two platforms, feel free to comment below, and I’ll try to help you with that.
Part 2. How to Install Spicetify to Customize Spotify
How to Install Spicetify Spotify
If your network connection is good, the process of installing and configuring Spicetify will be very easy.
Step 1. Go to Spicetify’s dedicated installation page mentioned above.
Step 2. Copy the Powershell command line used to install Spicetify on the top.
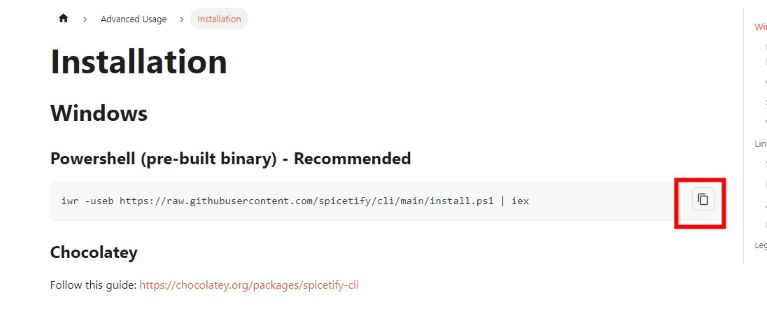
Step 3. Press “Windows” and “R” key simultaneously to bring up Run dialogue. Then type in “powershell” to open powershell window. Paste the powershell command you just copied and hit “Enter” to execute it.

Note:
When it ask you if you want to install marketplace, remember to type “Yes” to confirm installation. this will make the subsequent installation of extensions much easier.
At this point, you have successfully installed Spicetify. When you open Spotify, you will see a shopping cart icon on the left sidebar, which is the Spicetify marketplace you just installed.
![]()
How to Set Up Spicetify
Thanks to Spicetify marketplace’s GUI interface, setting up various themes, extensions and apps is also a straightforward process.
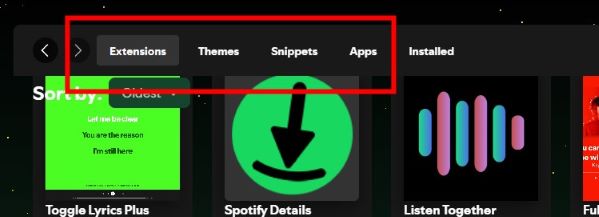
Step 1. Click on the shopping cart icon on the left sidebar.
Step 2. Then you can see three tabs on the top, “Extensions”, “Themes”, “Snippets” and “Apps”.
Note:
I didn’t mention “Snippets” earlier, it’s a exclusive feature in Spicetify marketplace, and usually make even smaller changes to your Spotify client compared to “Extensions”.
Step 3. If you want to install the specific functionalities, just click “Install” on the bottom right corner of their preview cards.
And Spicetify apps’ installation is a little different from that of other Spicetify functionalities. If you have trouble installing Spicetify apps, you can refer to the video below.
YouTube Video: How to Use Spicetify Deep Dive
Part 3. How to Install Spicetify to Customize Spotify if Network is Poor
I noticed that most online tutorials suggest using PowerShell to install Spicetify. However, when I first tried using the PowerShell command, it didn't work, and I kept encountering this "InvokeWebRequestCommand" error.
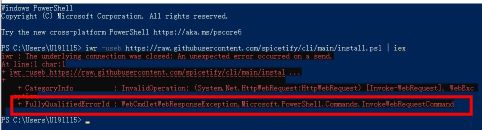
I later discovered that the VPN I was using was causing this issue because switching to a different VPN resolved the error. So, what if you don't have a working VPN, or other factors are causing your network connection to be poor? Don't worry, there's still a way!
How to Install Spicetify Spotify on Windows Under Poor Network
Spicetify’s official installation page lists four ways to install Spicetify on Windows, including powershell command line, chocolatey, scoop, and winget.
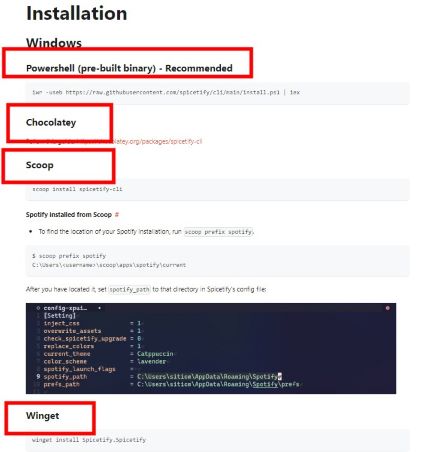
After some testing, I find that installing Spicetify through winget works perfect even with my original malfunctional VPN. Here’s a step by step guide to install Spicetify with winget:
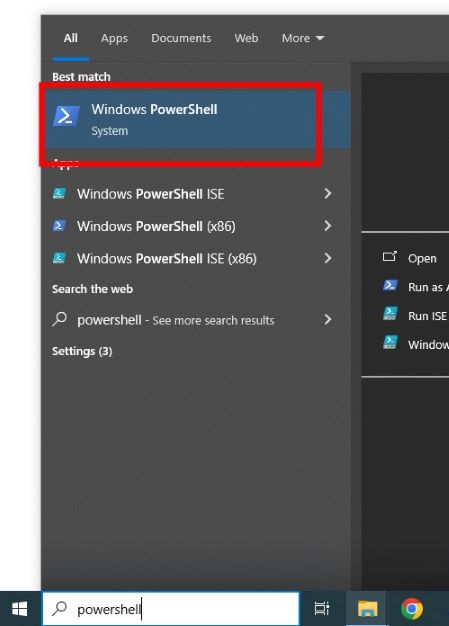
Step 1. In the search bar located on the left side of the taskbar in Windows, type “PowerShell” and click on the first result to open the PowerShell window.
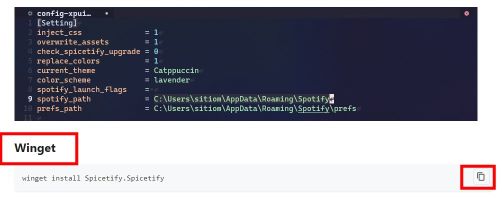
Step 2. Go to the official installation page of Spicetify, scroll down to winget section, hover over the right part of the command line, and click on the copy button to copy it.
Step 3. Go back to the opened powershell window, paste the copied winget command line and hit Enter key to execute it.

Maybe your result isn"t the same as mine, don"t worry, it"s because I"ve installed Spicetify before, as long as it shows installation is complete at the end of your results, you are good to go.
How to Set Up Spicetify Spotify without Spicetify Marketplace
Before we start installing those themes and tweaks without Spicetify marketplace, we need to find where Spicetify is installed on your desktop. To do this, type the following command and press Enter key. This will automatically generate a config file and open the folder where Spicetify is located.
spicetify config-dir
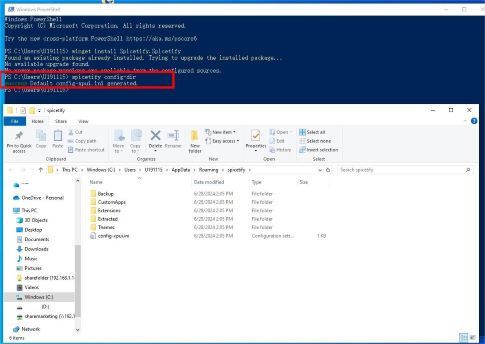
Don't close this folder, we need to use it later.
Tips:
You can simply run command “spicetify” in powershell to see all the available commands.
How to Install Spicetify Themes for Spotify
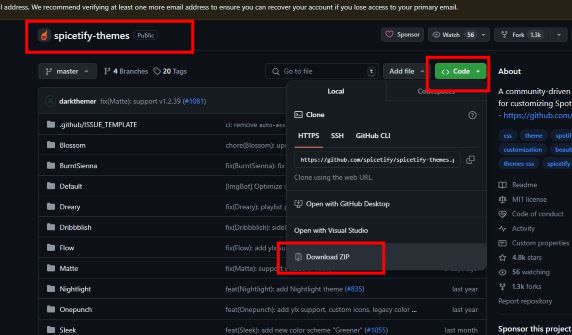
Spicetify also has a dedicated page for their themes, just visit its official installation page and select “Themes” tab, here lists all the available sources of Spicetify themes. I will demonstrate how to install themes with Spicetify’s official GitHub project for themes.
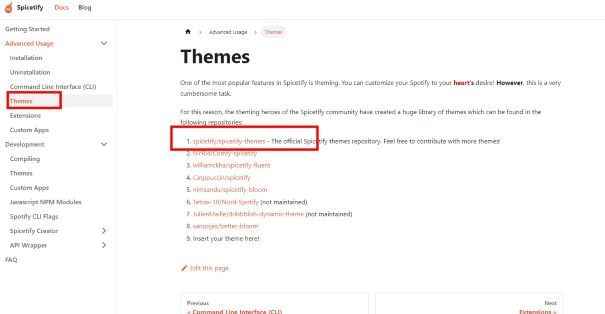
Hit on the Spicetify’s official GitHub project for themes which is the first option, this would direct you to the GitHub project, then go to “Code”, and “Download ZIP”
After downloading, extract the zip file. In the folder, you can see a lot of folders for various themes. Begin from “Blossom” to” Ziro”.
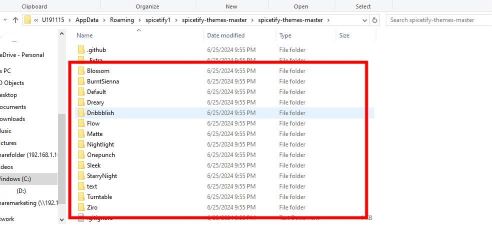
Before installing, you can click into each one of them, and go to “screenshots” folder to have a preview of each theme. For convenience, just select and copy all the theme folders from “Blossom” to” Ziro”.
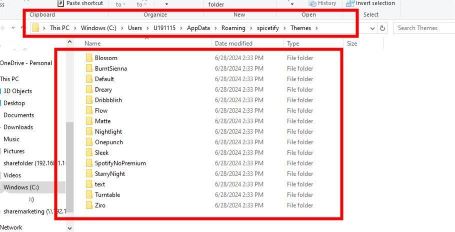
Remember the folder where Spicetify is located which I told you not to close? Go back to it, paste all the copied folders into “Themes” folder.
Note:
If you closed it accidentally, just execute the command “spicetify config-dir” in powershell to reopen it.
Next. execute command below in powershell to tell the program which theme you"d like to install first:
spicetify config current_theme <theme name>
Please replace “<theme name>” with the name of your targeted theme. For example, if I want to install the theme “Nightlight”, I need to execute this command:
spicetify config current_theme Nightlight
Then type the command below to backup Spotify because you may want to restore Spotify to original state later. This command would also begin to find and apply the theme you specified to your Spotify client.
Spicetify backup apply
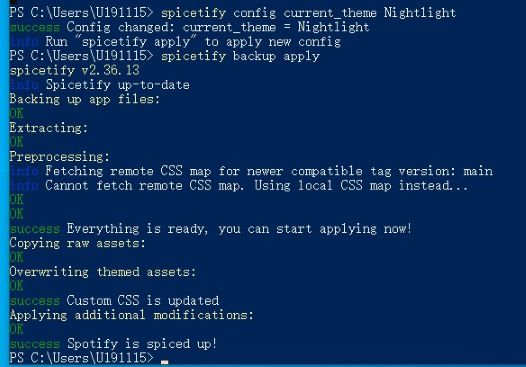
After it"s done, your Spotify client would launch automatically, and its theme has already been changed into this nice Nightlight theme.
You can install other themes with the same process mentioned above.
How to Install Spicetify Extensions for Spotify
The process of installing Spicetify extensions is essentially the same as that with Spicetify themes. Let"s see how to do it.
First, you can find all the sources of Spicetify extensions in Spicetify’s official installation page as well. Just go to “Extensions” tab and you can see them.
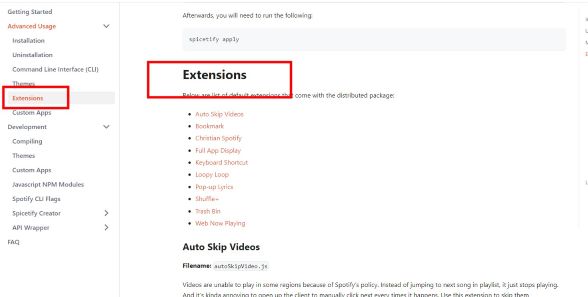
Note: You can scroll down to see what function does each extension serve for.
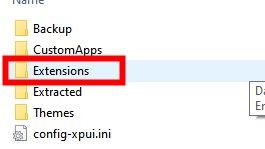
On Spicetify’s official GitHub page: https://github.com/spicetify/cli, you can download the extensions released by them. To do it, go to the green button “Code”, then ”Download ZIP”, extract the zip file and go into “Extensions” folder, here you can see their extensions.
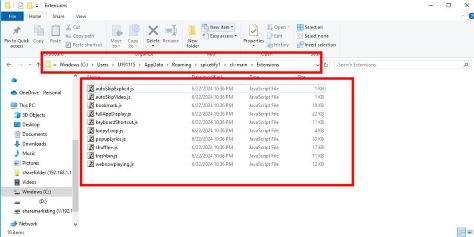
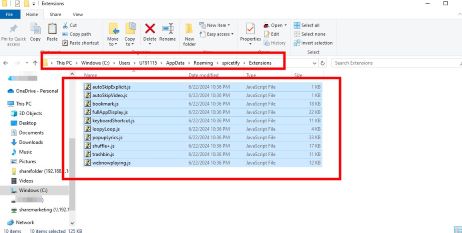
Copy them and go to Spicetify folder, paste them into the “Extensions” folder.
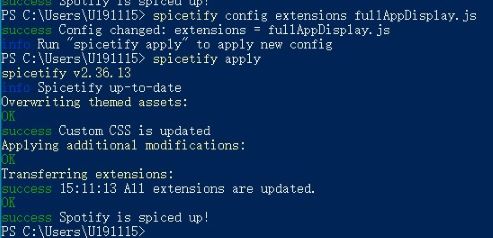
Ok, now we need to config extensions. In powershell, type following command to tell Spicetify which extension you want:
spicetify config extensions <extensions name>
Replace “<extensions name>” with the extension in question. For example, if I want the fullAppDisplay extension, just type:
spicetify config extensions fullAppDisplay.js
And then run this command to apply it:
spicetify apply
After the process is done, you can find this icon for the extension on the top.
![]()
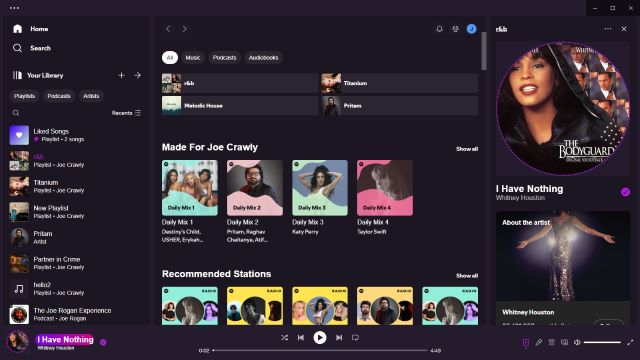
And when I click on it, it will enter this full display mode which has a beautiful blur effect background.

There are many other interesting extensions, you can try them out and find which suits your taste.
How to Install Spicetify Apps for Spotify
The process of installing Spicetify is relatively easy. Spicetify now supports three apps, including Reddit, New Releases, and Lyrics Plus.
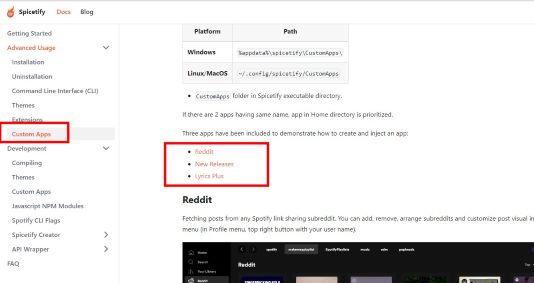
Personally, I find Lyrics Plus to be the most practical. First, Spotify Free users can use it to view lyrics while listening. Additionally, it doesn"t rely on Spotify’s official lyrics source, it can provide lyrics for songs that don"t originally have them on Spotify. With Lyrics Plus, you can view lyrics for almost every song on Spotify. Moreover, it allows you to switch between sync, unsync, and karaoke modes while listening.
To install the Lyrics Plus app for Spicetify, execute the following command:
spicetify config custom_apps lyrics-plus
spicetify apply
After it"s done, Spotify would automatically launch, and you will find a new “Lyrics” tab on the left sidebar. When you are listening to a song, click on this tab, the lyrics of that song would appear in the center of your Spotify client.

You can choose from “Karaoke”, “Synced”, “Unsynced” mode to view lyrics in the top bar.
To install other apps, check the respective needed commands on Spicetify’s official app installation page: https://spicetify.app/docs/advanced-usage/custom-apps.
Part 4. How to Block Ads on Spotify through Spicetify
How to Block Ads on Spotify with Spicetify Marketplace
To block ads on Spotify with Spicetify, you can use the specific functionalities to achieve this. And if you have the GUI interface of Spicetify marketplace on your Spicetify client, it will be very straightforward.
Step 1. After you have installed Spicetify, launch Spotify on your computer.
Step 2. Click on the shopping cart icon on the left sidebar.
Step 3. Under the “Extensions” tab, search for “Adblockify” and install it.

Step 4. Restart your Spotify client to apply. After this, you won’t encounter any audio or video ads on Spotify.
How to Block Ads on Spotify without Spicetify Marketplace
If you don’t have Spotify marketplace installed. You can still install the extension “Adbockify” through command line.
Step 1. Go to GitHub page of Spicetify extensions.
Step 2. Download this GitHub repo.
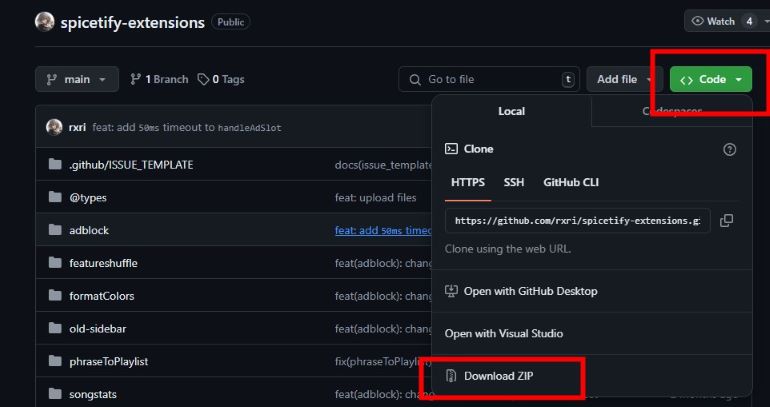
Step 3. Extract the file, open and locate the “adblock.js” in the “adblock” folder.
Step 4. Press “Windows” and “R” key to bring up Run dialogue, then type in “powershell” and hit Enter to open powershell window.
Step 5. Type in following command and the spicetify folder will automatically open.
spicetify config-dir
Step 6. Then copy the “adblock.js” file we just mentioned into the “Extension” folder.
Step 7. In powershell window, type in following command to install this extension.
spicetify config extensions adblock.js
spicetify backup apply
After all the steps above are finished, the ads blocking feature will be added to your Spotify.
Another Option to Block Ads on Spotify through Spicetify
Spicetify has an extension to block ads on Spotify, we can find the js file for this extension in the folder for “SpotifyNoPremium” theme downloaded when we try to install Spicetify themes for Spotify. If you haven"t downloaded it, you may need to download it with the steps mentioned above first.
After downloading, follow these steps to block ads with Spicetify:
Step 1. Go to “Themes” folder under the “spicetify” folder on your computer
Step 2. Go to the folder named “SpotifyNoPremium”.
Step 3. Copy the file “adblock.js”.
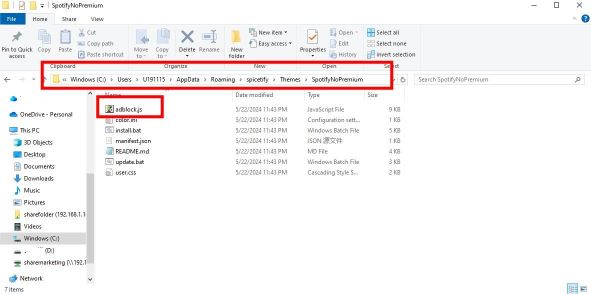
Step 4. Paste it into the “Extensions” folder under spicetify folder.
Step 5. Execute the following command in powershell.
spicetify config extensions adblock.js
spicetify apply
After the installation is done, most of the ads on your Spotify client won"t appear.
Tips:
To clear ads on your Spotify client completely, you can install SpotX Spotify.
Part 5. More FAQs about Installing Spicetify
Q1: How to uninstall the Spicetify extensions and apps I installed?
A1. You need to run command in powershell in this format:
spicetify config extensions/custom_apps <extensions/app name>-
Replace “<extensions/app name>” with the one in question and remember to add a “-” in the end.
Q2: How to uninstall Spicetify?
A2. Simply run these commands in powershell:
spicetify restore
rmdir -r -fo $env:APPDATA\\spicetify
rmdir -r -fo $env:LOCALAPPDATA\\spicetify
Q3: How to restore my Spotify to original state?
A3. You can uninstall Spicetify or execute command below to simply restore:
spicetify restore
Q4: Can I use Spot and Spicetify together?
A4. It"s not recommended, but from my test, they work well with each other after I downloaded them both on my computer. But note that you need to download SpotX first, or you will be prompted to uninstall Spicetify when installing SpotX.
Part 6. How to Keep Spotify Music Forever without Spotify Premium

We mentioned earlier that Spicetify allows us to view lyrics on the Spotify client even without a Spotify Premium account. During my tests, I found that this feature also works when playing local songs on Spotify. Typically, you can"t view lyrics in Karaoke mode for local tracks, but "Synced" and "Unsynced" modes still work.
- In Synced mode, Spicetify tries to grab lyrics from Netease for locally stored songs.
- In Unsynced mode, it reads the ID3 tags stored in the local audio files to display the lyrics.
This lyrics feature of Spicetify enables us to view lyrics as Spotify Premium users while listening to Spotify music locally. But how to download Spotify music locally? When you download Spotify music with a Spotify Premium account, you lose access to those downloads once your subscription expires. So, what if you don"t want to pay Spotify’s monthly fee? How do you solve this catch?
Don"t worry! DRmare Spotify Music Converter can help. DRmare Spotify Music Converter allows you to download and convert Spotify music with lossless quality into MP3, WAV, FLAC, and other common formats, so that you can save them locally. In addition, it can preserve all the ID3 tags while downloading. So that you can view lyrics with Spicetify’s Lyrics Plus feature when listening to them from Spotify client on your desktop.

- Download Spotify playlists and songs and listen to them anywhere, anytime
- Convert Spotify music at 5x speed
- Save Spotify music locally with lossless quality
- Friendly and easy-to-navigate interface
Next, let"s see how to download and convert Spotify music into common audio formats to save locally with DRmare Spotify Music Converter.
- Step 1 Add Spotify Songs/Playlists to DRmare
- Step 2 Set Output Format and Other Parameters
- Step 3 Remove DRM and Download Spotify Music Tracks
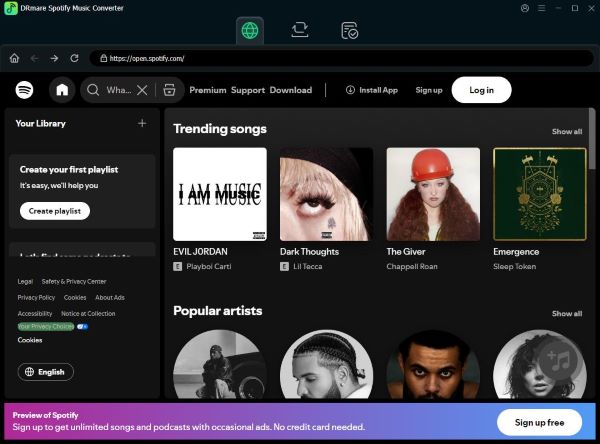
There are two ways to add Spotify music to the DRmare Spotify Music Converter. First, you can drag and drop any song, playlist, or album directly into the DRmare conversion window. Alternatively, you can copy and paste the URL link of a Spotify playlist into the DRmare search bar and click the "+" button to confirm.
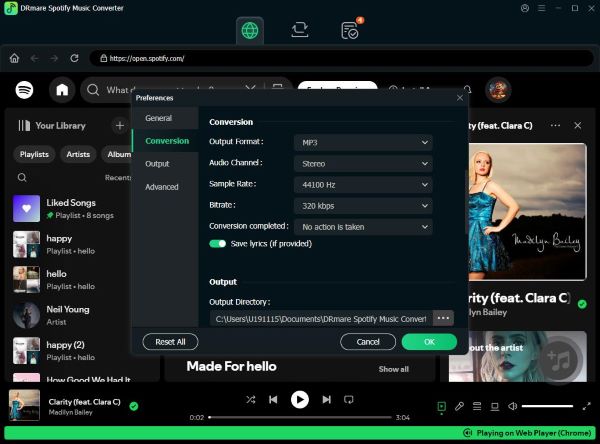
Navigate to the menu bar of DRmare and select "Preference" to open a new window. In the popup window, you can customize the output formats and audio quality you want.
Click the "Convert" button to start the converting process. The DRmare music downloader will remove DRM and download the Spotify tracks as DRM-free audio files.
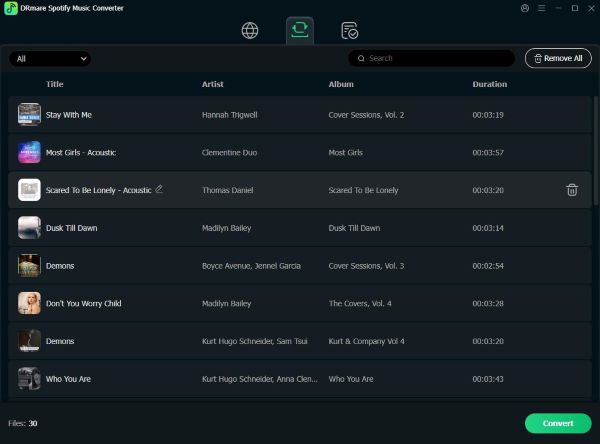
After conversion, you can find the converted music in the specified folder.
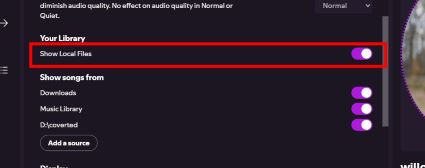
To play downloaded local Spotify music in Spotify client, go to Spotify settings and turn on “Show local files” option.
Then, when you listen to these local Spotify music from your Spotify client, you can enjoy ads-free, lyrics, high-quality music as Spotify Premium users without paying for Spotify Premium!


User Comments
Leave a Comment