As a popular video editor, in general, it is very easy to import and edit movies on Mac on iMovie. However, to add videos from iTunes to iMovie is a little hard. So, how to fix this issue?
Please don't worry. In this post, we will show you the way on how to import videos to iMovie from iTunes on Mac. Besides, here you can learn more tips about iMovie. Now just refer to the tutorial below to learn more.

Part 1. Why Can't We Import Video to iMovie from iTunes Directly
About iMovie
iMovie is a free bundled video editing software for Mac and iOS devices. It is a powerful video editor for both beginners and professionals. And it is with a variety of video footages and effects provided. It also supports 4K video and more sharing options.
It allows users to change the speed of clips and add text to clips. Also, you can apply visual effects and share to popular web video sites. And it keeps some of the best storyboard-based movie making tools for novices. It is the Trailers and Movies along with excellent green-screen and soundtrack capabilities.
In addition, the supported video file formats of iMovie are MP4, MOV, MPEG-2, AVCHD, DV, HDV, MPEG-4 and H.264.
About iTunes Movies and TV Shows
While iTunes videos, they are encoded with Apple's FairPlay right protection. Therefore, iTunes videos come with a protected .M4V format. They can only be smoothly played on authorized Apple devices. They can't be copied and played on other programs or devices like iMovie, etc.
In result, from above, you may know why you can't import videos to iMovie from iTunes. But please don't worry. In the next part, you will get the solution.
Part 2. How to Edit Movies in iMovie from iTunes with DRmare iMovie Converter
To get iTunes movies to iMovie, you must convert iTunes movies first with an iMovie converter. Besides, since iMovie only supports MP4, MPEG-4, .MOV, HDV and AVCHD, you'll need to convert M4V to iMovie compatible formats.
Here, we are introducing DRmare iTunes M4V Converter, which will help you easily convert M4V iTunes videos to MP4 or MOV formats for iMovie. It also provides preset profile of iMovie, so you can directly convert the iTunes movies to meet the iMovie settings.

- Rip DRM from iTunes M4V rentals and purchases
- Convert iTunes M4V to MP4, MOV and other formats
- Convert iTunes videos to preset iMovie profile
- Retain original audio tracks, subtitles, AC3 5.1 Dolby, closed captions
Part 3. Detailed Guidance on How to Convert M4V to iMovie
After learning the key features of DRmare M4V to iMovie Converter, now you can follow the complete guide as below. Here you can convert and import M4V into iMovie for editing with 3 steps only. Before starting, please download and install DRmare M4V Converter to your computer via the "Download" button above.
- Step 1Add iTunes M4V videos

- Launch the DRmare iTunes M4V to iMovie Converter on your Mac. Then add your iTunes movies or TV episodes to DRmare in two ways. One is clicking the "Add" icon at the bottom left of the program. Then you can choose the movies or TV shows you want to import to iMovie from the drop-down iTunes library list. The other way is dragging the iTunes files directly to the converter.
- Step 2Set output parameters for iMovie

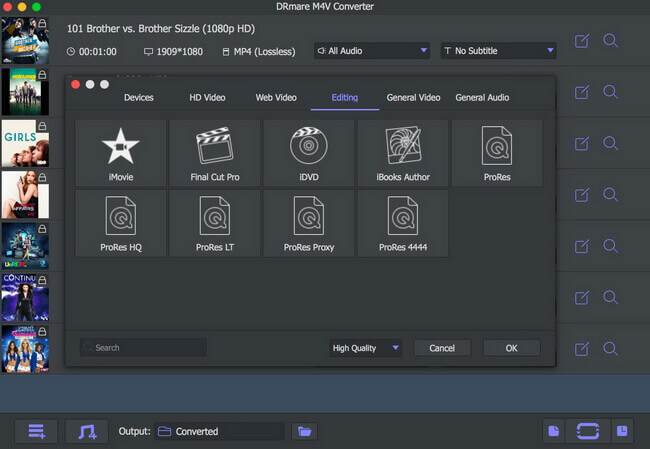
- To import iTunes movies to iMovie, you should choose a proper output format in DRmare. Currently it provides optimized profile for iMovie as well as MOV, MP4 and other iMovie compatible formats. Here we'll choose the specific ready-made iMovie format in 'Formats' button > 'Editing' > 'iMovie'. Then click "OK" to save the setting.
- Step 3Convert M4V to iMovie compatible format

- When all settings are adjusted, you can click "Convert" button at the bottom right of DRmare. Then it will begin to convert iTunes M4V videos to iMovie. After the conversion, you can locate the converted video files on your computer by clicking the "Converted" button.
- Step 4How to import videos into iMovie from converted iTunes files
- Now you can start to import M4V into iMovie from the converted iTunes files for editing. Please follow the simple steps below and get started.

Step 1. Open the iMovie program and create a new project on the timeline.
Step 2. Define the project theme, the project name, put in the aspects ratio and the frame rate.
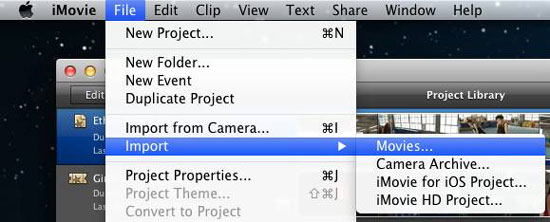
Step 3. Import video to iMovie from converted iTunes files to iMovie Event Library by hitting 'File' > 'Import'.
Step 4. After then, you can edit movie in iMovie from iTunes directly.
Video Tutorial: How to Convert M4V to iMovie
If you prefer to video tutorial, you can follow this video guide to learn how to convert M4V to iMovie for editing by using DRmare M4V Converter.
Part 4. iMovie Shortcuts Keys You Should Know
If you want to be an iMovie master, then you shouldn't miss some useful iMovie shortcuts keys here. With these shortcuts, you can edit your video clip in iMovie quickly.
1. Use 'Command + B' to split the video clips overplayed.
2. Use 'Command + Z' to undo your last action.
3. The 'Up-Down' arrow can let you reaching the ending and starting part of each video clip.
4. 'L' is used to speed up any track.
5. The 'backslash' can help you play videos directly from the initial point.
6. To create a new movie project, use the 'Command + N'.
7. Select all clips by 'Command + A'.
8. Move an item to Trash via 'Command + Delete'.
9. Choose part of a clip by holding 'R' and drag.


User Comments
Leave a Comment