If you have updated your Mac operating system to the latest version, macOS High Sierra, you must have experienced its wonderful new features, like faster running speed, a new file system as well as smarter Safari. But every coin has two sides. The macOS 10.13 is not perfect for anything, especially for iTunes DRM removers.
If you try some top-leading iTunes DRM removal tools on your MacBook Pro running macOS High Sierra 10.13, you can discover it's impossible to use any iTunes M4V converter, even they are professional to remove DRM protection encrypted in M4V movies and TV shows. And you will be told by software developers that the DRM crackers are not compatible with macOS High Sierra currently.
As a result, will you give up bypassing DRM technology from iTunes purchases and rentals? Not really. In this article, I will show you two possible approaches to break the DRM lock of iTunes videos on macOS 10.13.
View also: How to Strip DRM from Apple Music
Part 1. Two Possible Ways to Remove DRM from iTunes Videos on macOS 10.13
When you met some obstacles using the FairPlay DRM removal software on macOS 10.13 High Sierra and asked the company support for how to solve this problem, generally speaking, you will get the official answer, "We are trying our best to fix out its compatible issue. So as to solve your problem temporarily, you are able to downgrade macOS High Sierra to macOS 10.12 or lower version or use this paid tool on your computer running Windows operating system."
Obviously, it's not a smart choice to downgrade the latest Mac operating system only for being compatible with an app. As for the second recommended solution, it's acceptable for people who are eager to bypass DRM restriction from iTunes videos and actually own a Windows computer. However, what you will do if you don't have a PC? Waiting for the update of iTunes DRM M4V converters? Out of question, it's not an ideal way.
For the purpose of keeping up with the update speed of macOS, there must be some other way out. As consequence, there are feasible methods for you to remove DRM from iTunes movies and TV shows on laptop running macOS 10.13 High Sierra without downgrade Mac operating system and no need to equip with Windows computer, respectively creating Dual-boot macOS and creating Dual-boot Windows using BootCamp or Virtual Windows.
Method 1. How to Dual Boot macOS 10.13 High Sierra & Sierra 10.12
In general, iTunes M4V converters are fully compatible with OS X 10.8 to macOS 10.12, such as DRmare M4V Converter. So creating a dual-boot system on your macOS 10.13 High Sierra is a recommended solution. Apart from making it possible to remove DRM lock on the latest Mac operating system, you are able to download and install two different versions of your favorite tools and software with two different macOS system.
In the following article, I will give the simple tutorial to guide you on how to dual-boot Sierra on the macOS High Sierra.
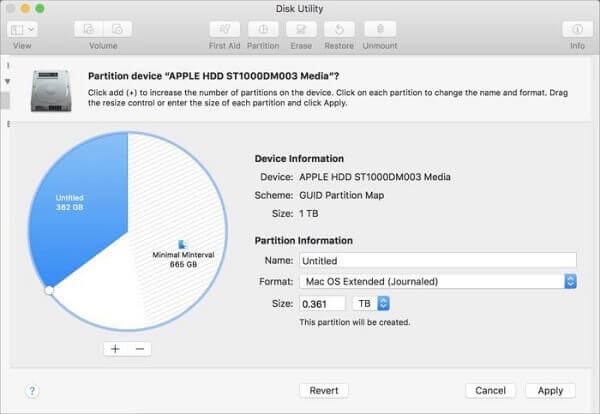
Step 1. Download macOS 10.12 Sierra. You can download the wanted Mac operating system from Mac App Store.
Step 2. Determine how much space you need. Before we start to create a new partition, we need to calculate how much space it will need. Generally speaking, the Mac operating system takes at least 20GB of space to store. Plus, if you are planning to use it a lot, you can set up more space for this.
Step 3. Create a new partition. Open the Utilities -> Disk Utility on your Mac, and choose the hard disk called Macintosh HD that is the main OS partition. And then you can tap the Partition tab and click the "+" button to add a new partition. Now, you can customize the name (such as macOS 10.12 Sierra), Mac OS Extended format, and the space for the new partition. Once all settings are OK, please hit the Apply.
Step 4. Install the macOS Sierra on your new partition. Go to the Applications folder to double click the Install macOS 10.12 Sierra file. After that, you just need to follow the on-screen instruction to install the new Mac OS X system.
- Note: In order to use one of them, you have to restart to switch them. Besides, you'd better to back up your Mac data with iCloud or Time Machine as it may clean your startup disk while dual booting before you start to follow this tutorial.
Method 2. How to Create Dual-boot Windows using BootCamp or Virtual Windows
No matter which iTunes DRM removal software you have, you will find out that it can work well with the latest Windows operating system to get rid of DRM limitations from purchased iTunes videos. So if you don't have a Windows computer, why not create dual-boot Windows OS or run a Windows VM on your macOS High Sierra.
You are able to create a dual-boot Windows using BootCamp, macOS built-in tool or run Windows as a virtual machine on the macOS 10.13. As for the first way, there is a detailed guide for your reference: How to Dual boot Windows on macOS 10.13 with BootCamp. Below I will give the complete tutorial to show you how to install a virtual Windows on the macOS High Sierra, which is easier than configuring Boot Camp for a native Windows experience.
- Step 1Download Windows 10 ISO from Microsoft
- To get started, you are able to enter into the Microsoft Windows download center to download an IOS image of the Windows 10 technical preview.
- Step 2Download VirtualBox/VMware Fusion/Parallels
- To run Windows inside OS X, there are three virtualisation programs for your choice: VirtualBox, VMware, and Parallels. If you would like to use a freeware, VirtualBox is the best choice as a totally free tool for you to create a virtual machine, but it's too complicated and difficult. Of course, if you can afford the $79.99 to pay for a simple virtualisation program, you can turn up to download VMware Fusion or Parallels.
- Step 3Launch VirtualBox and customize the settings

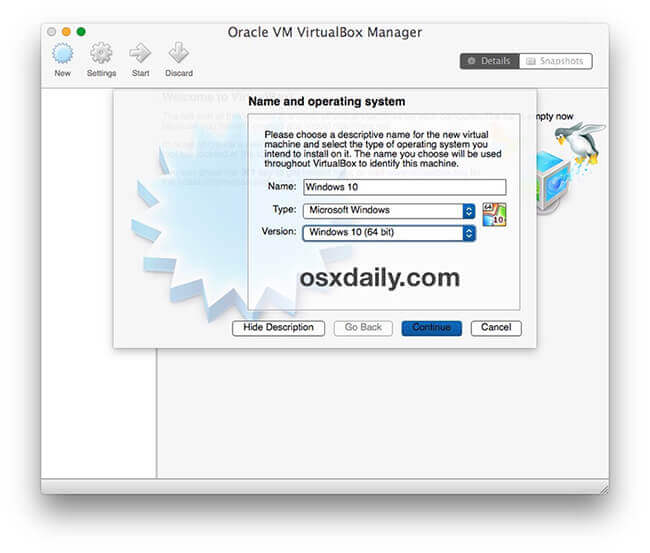
- Open the VirtualBox and click the File -> New button to build a new virtual machine. And then you can customize the name, type and version of the new virtual machine, such as Windows 10. Once all settings are OK, please click Continue button to choose a new virtual hard drive.
- Step 4Install Windows 10 in virtual machine

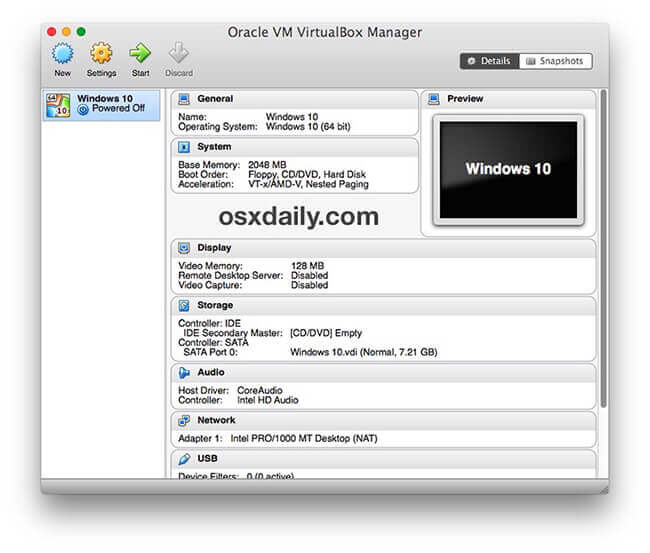
- Now, you can enter to the main interface of VirtualBox and select Start button to boot the new Windows 10 volume. And then you can choose Windows 10 ISO as the virtual optical disk by clicking the Folder icon. Now, you can click the Start icon to launch the standard process of Windows 10 installment, such as choosing language, creating a new account and doing some basic Windows configuration. Now, you just need to wait the end of this installment process.
Note:
Once this process finishes, you can run Windows as a virtual machine on macOS High Sierra. Quitting VirtualBox means that you like to shut down the Windows 10. If you want to run Windows again in macOS 10.13, you just need to open VirtualBox again and choose the Windows 10 virtual machine.
Part 2. Best Software to Remove DRM in Windows 10 VM on macOS High Sierra
No matter which way mentioned above you choose, the steps removing iTunes DRM are the same as a true machine with the help of DRM M4V converters. If you already have an iTunes DRM cracker, you can launch it to release your iTunes video files now. If not, you can meet DRmare M4V Converter, which is specialized in bypassing DRM restrictions from iTunes purchases and rentals and convert iTunes M4V to a wide variety of audio and video formats, like MP4, MOV, AVI, MKV, MP3, etc.
Taken DRmare M4V Converter for Windows as example, I will introduce the detailed tutorial to remove FairPaly DRM from iTunes purchased and rented movies and TV shows on macOS High Sierra running Windows as a virtual machine.
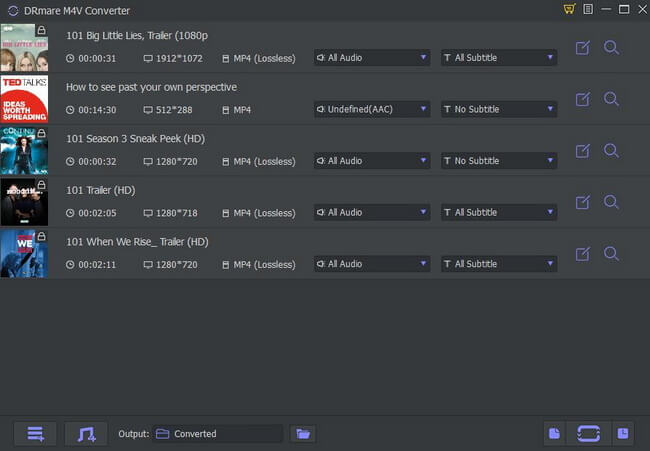
- Step 1Import downloaded iTunes videos to DRmare

- In order to add iTunes movies and TV shows to DRmare software, you can drag and drop protected iTunes files to the main interface of this smart software or click the "Add Files" button to choose favorite iTunes videos from iTunes library directly.
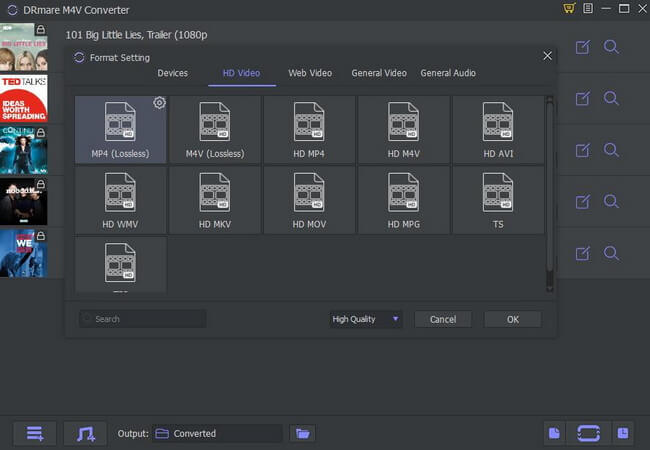
- Step 2Set output format as you like

- Since DRmare M4V Converter supports a lot of output formats, such as MP3, MKV, MOV, MPEG, and more, you can choose the wanted format as the output format by clicking the "Format" button.
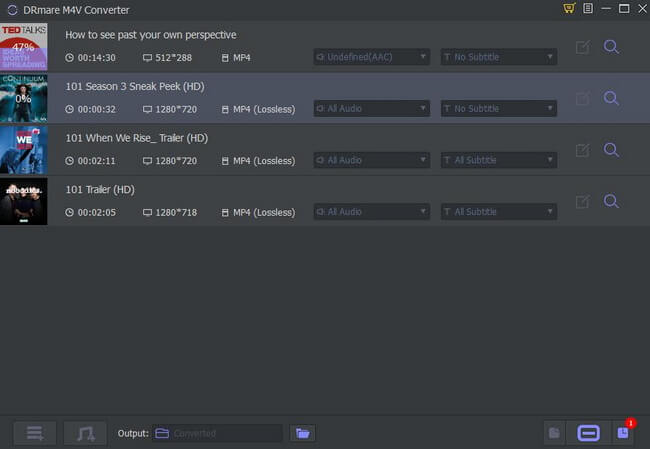
- Step 3Remove DRM from iTunes movies

- Once all settings are ready, you can click the "Convert" button to start the converting process. Once the conversion process completes, you can locate iTunes DRM-free movies and TV shows on destination folder.




User Comments
Leave a Comment