iTunes is a popular media player that lets you manage your music files, including Apple Music and other media files. Songs purchased from the iTunes Store are usually in AAC format. If you downloaded songs from Apple Music, they are MPEG-4 AAC (M4P). iTunes also recognizes other file formats, including Apple Lossless, AIFF, and WAV. However, none of these formats is more widely used than MP3.
Many users want to export iTunes playlist to MP3 so that they can listen to their favorite songs on other devices or platforms. Thankfully, you can download iTunes playlists as MP3, AIFF, or WAV using the Apple Music app on Mac or iTunes on Windows. Note that this method only works for unprotected iTunes music. Therefore, we will also guide you to export entire iTunes library to MP3 format.
Part 1. How to Export iTunes Playlist to MP3 via iTunes/Apple Music App
iTunes can play a variety of audio file formats, including AAC, Apple Lossless, AIFF, and WAV. The latter two formats are uncompressed, so the music quality is good, but the files take up disk space. Apple Lossless is an audiophile format that rivals AIFF and WAV in sound quality, but takes up half the space.
If you want to convert song files between compressed and uncompressed formats, iTunes or Music app makes it easy for you. It has a built-in feature that allows you to convert song formats. Here is a quick guide.
Note:
1. If you convert between compressed formats or from uncompressed to compressed formats, the sound quality will be reduced.
2. If you buy iTunes songs before 2009, they have DRM copyright protection added, this method will not work.
Convert iTunes Playlist to MP3 via iTunes
Step 1. First and foremost, you will need to download iTunes on your Windows PC.
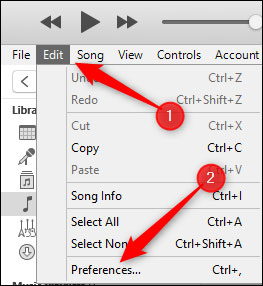
Step 2. Open iTunes and go to the main menu bar at the top of the screen. Click on "Edit" and then select "Preferences".
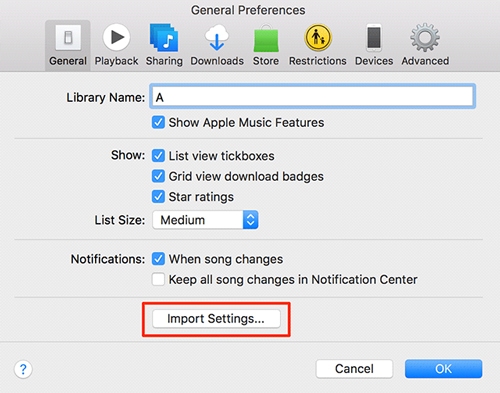
Step 3. Now, click on "General" and hit on the "Import Settings..." option.
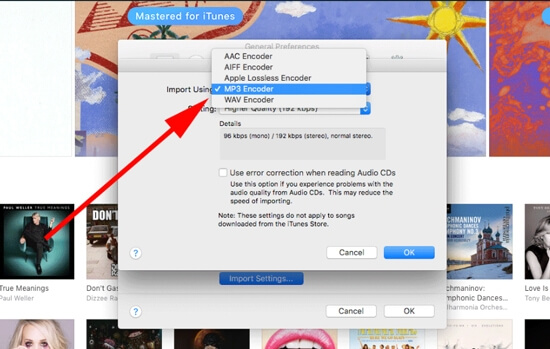
Step 4. Then change the "Import Using" option to "MP3 Encoder" and then click on the "OK" button to save the changes.
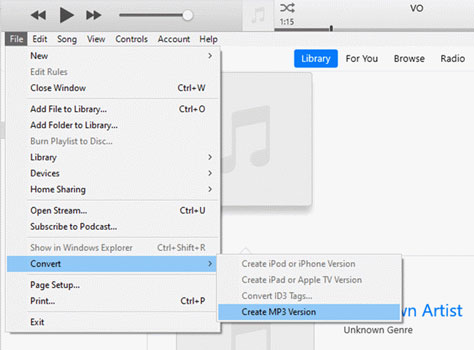
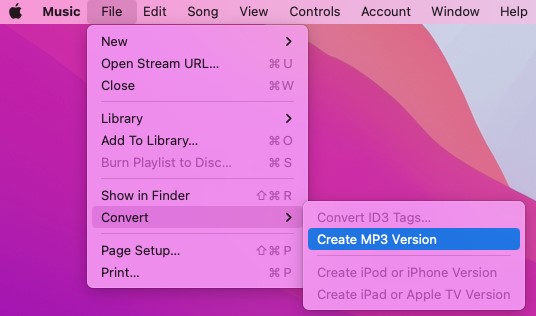
Step 5. Finally, head to your iTunes Library and select the song you want to convert. Then click the "File" menu > "Convert" > "Create MP3 Version" to change iTunes playlist to MP3. This way, iTunes will retain a copy of the original songs and, at the same time, create an MP3 audio file for you.
Download iTunes Playlist to MP3 via Apple Music App
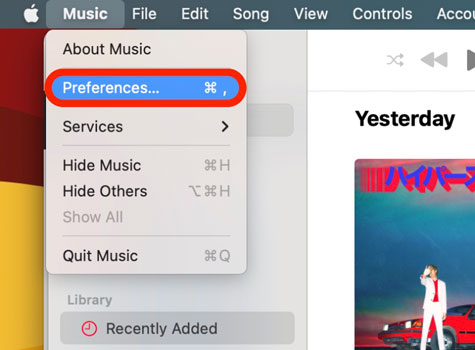
Step 1. First, open the Music app on your Mac computer or Windows 11 and Windows 10 PC computer. Next, click on "Music" > "Preferences".
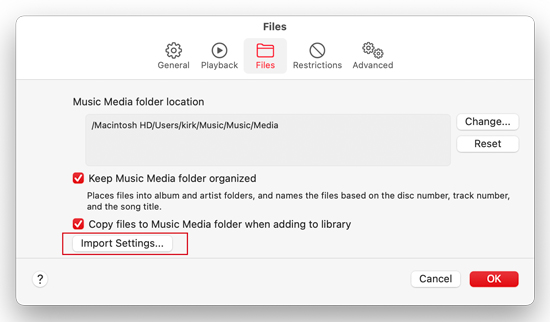
Step 2. Select the "Files" option at the top of the window. Next, hit the "Import Settings" button.
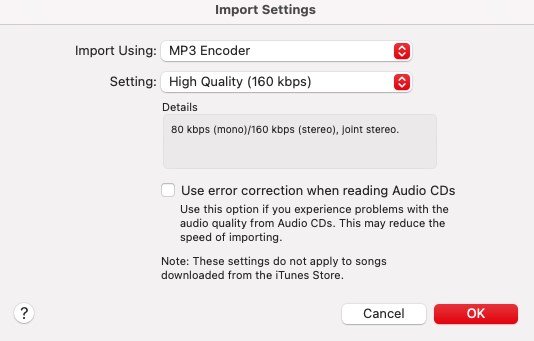
Step 3. Choose "MP3 Encoder" to personalize the audio quality. Then click on "OK".
Step 4. Finally, select the iTunes songs from the library. Then, hit "File" > "Convert" > "Create MP3 Version" to export music from iTunes to MP3. The MP3 files of your song will appear in your library next to the original files.
Pros and Cons of Using iTunes/Apple Music App
Pros
-
 No need to install extra apps
-
 Free
Free
-
 Support MP3, AAC, AIFF, WAV, Apple Lossless
Cons
-
 DRM-protected songs are not supported
-
 Reduce output quality
-
 Slow conversion speed
Part 2. How to Export iTunes Library to MP3
It is very convenient to export MP3 from iTunes using the iTunes app or Apple Music app. However, this method does not support protected songs and reduces the original sound quality. Also, the process is very slow and you may spend a lot of time converting several iTunes tracks.
In this case, you need a better approach that addresses all of the above drawbacks. DRmare Apple Music Converter is your best choice. It can export entire iTunes library to MP3, FLAC, AAC, M4B, WAV, etc. with original sound quality. It supports converting protected Apple Music, iTunes songs, and other common music files. The download process will be fast, 30 times faster than iTunes conversion. All ID3 tags, such as title, album, artist, etc. will be preserved, and you can also customize these tags.

- Convert iTunes library to MP3/FLAC/AAC/M4A/M4B/WAV
- Remove protection from iTunes songs/audiobooks/playlists
- Work at 30X faster speed with lossless audio quality kept
- Maintain and edit full ID3 tags including the title, album art, etc.
How to Export Apple Music Playlist to MP3 with Lossless Sound Quality
- Step 1Install and launch the DRmare Apple Music Converter
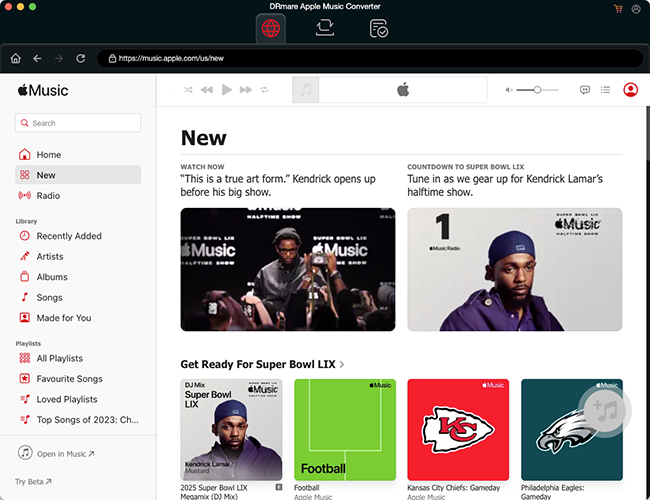
- From the official DRmare website, download and install the DRmare Apple Music Converter. Or you can directly click on the "Download" button above to get its free trial version. Then run the software on your computer and you will see some icons as shown above.
- Step 2Add iTunes playlists to DRmare Apple Music Converter
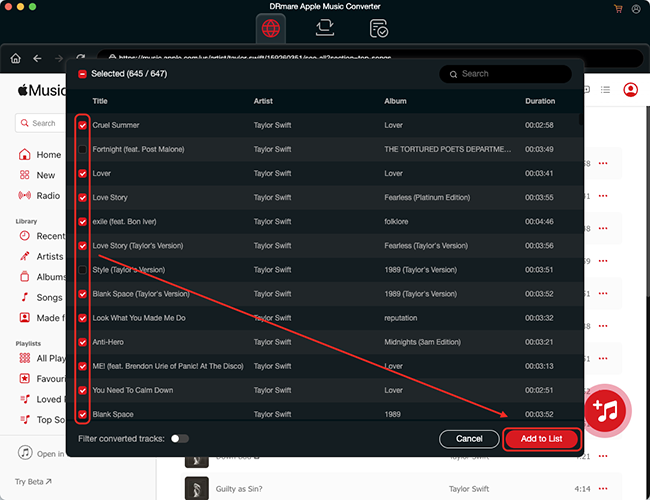
- Find your favorite songs in Apple Music Web Player, and hit the "+" buttons located at the bottom-right corner to upload the iTunes songs. Before clicking "Add to List" button, you can select certain songs for conversion. You can import as many songs as you want because this software supports batch conversion.
- Step 3Customize output settings for iTunes playlists
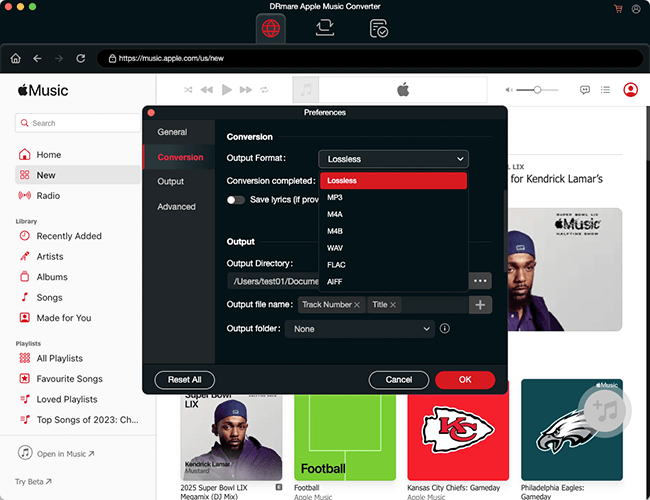
- On the main interface of DRmare Apple Music Converter, click on "DRmare Apple Music Converter" > "Preferences" option to launch the audio settings window. You can select the audio output format for iTunes playlists from the available option as you want. Besides, you can tweak the output codec, bit rate, sample rate, and more. Once you have made the changes, hit the "OK" button to save the changes.
- Step 4Download and export iTunes library to MP3 format
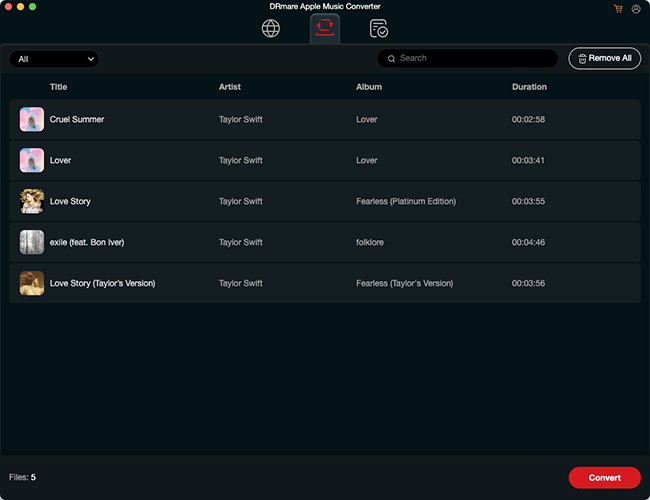
- Finally, hit on the "Convert" button to download Apple playlist to MP3. Once it is complete, hit the "Converted" icon to find the converted iTunes songs on your computer. Then you are able to listen to them offline with any music player or move them to other devices for playing. You can get Apple Music for free forever.
Pros and Cons of Using DRmare Apple Music Converter
Pros
-
 Support any iTunes music and other plain audio files
-
 Keep original sound quality and ID3 tags
-
 Work at 30 times faster
-
 Customize the output parameters
-
 Support MP3, FLAC, AAC, M4A, M4B, WAV
Cons
-
 Need to install DRmare Apple Music Converter
-
 Free trial only converts 1 minute of each song
Part 3. FAQs about Exporting iTunes Playlist to MP3
Q1: Why Is 'Export to MP3' Greyed Out in iTunes?
A1: If 'Export to MP3' is greyed out, it means that the song you selected is not available for conversion. This is because the music you are converting is DRM protected and iTunes cannot convert protected music. To check if your specific song is DRM-protected: Open your iTunes library, click the song, then choose 'Song Info/File' > 'Kind'.
If the song is protected, you can use DRmare Apple Music Converter to solve the issue. With it, you can convert protected and unprotected iTunes music, Apple Music, and Audible to MP3 or other common-used formats.
Q2: Can I Export My iTunes Playlist to Other Audio Formats Besides MP3?
A2: Yes. With iTunes or Apple Music, you can convert playlists between compressed and uncompressed formats including MP3, Apple Lossless, AIFF, and WAV. With DRmare Apple Music Converter, you can convert iTunes playlist to MP3, AAC, M4A, M4B, WAV, and FLAC.
Q3: Does Music Quality Suffer When Converting iTunes Library to MP3?
A3: It depends on the method you use. If you use iTunes or Apple Music, the music quality will suffer. If you use DRmare Apple Music Converter, the sound quality is 100% lossless.
Q4: How to Copy and Transfer iTunes Playlist to MP3 Player?
A4: Transferring an iTunes playlist to an MP3 player involves two main steps: first, exporting the songs from iTunes to MP3 format by following the above steps, and then copying them to your MP3 player. Here's a step-by-step guide to export iTunes playlist to MP3 player:
- Plug your MP3 player into your computer using a USB cable. Your computer should recognize it as an external storage device (like a flash drive).
- Go to your iTunes Music folder to find the newly converted MP3 files. The folder is usually located at:
- On a Mac: Music > iTunes > iTunes Media > Music
- On Windows: This PC > Music > iTunes > iTunes Media > Music
- You can also right-click a song in iTunes/Apple Music and select Show in Finder (Mac) or Show in File Explorer (Windows) to quickly locate the MP3 files.
- Drag and drop the MP3 files from your iTunes folder to the MP3 player’s music folder. Safely eject the MP3 player from your computer after the files have been transferred.
Part 4. In Conclusion
Comparison of 2 Methods to Convert iTunes Playlist to MP3
| Support Music | Support Output Format | Conversion Speed | Output Audio Quality | |
|---|---|---|---|---|
| iTunes/Apple Music App | Unprotected iTunes music | MP3/AAC/WAV/ AIFF/Apple Lossless |
Slow | Reduce audio quality for conversion to MP3/Apple Lossless |
| DRmare Apple Music Converter | iTunes music, Apple Music, Audible books, and popular audio files | MP3/AAC/WAV/ M4A/M4B/FLAC |
5 times faster | 100% original sound quality |
In Conclusion
There are two ways to export iTunes playlist to MP3. One way is to use iTunes/Apple Music, which is convenient because you don't need to install extra apps and it's free. However, there are some disadvantages, such as unsupportable protected songs, lowered sound quality, and slow conversion speed.
If you are concerned about these issues, a better option is DRmare Apple Music Converter. This is specialized software that allows you to convert your entire iTunes library to MP3 or other formats while maintaining lossless sound quality.


User Comments
Leave a Comment