—discussions.apple.com
Like most streaming services, Apple Music stores cache data to ensure smooth playback and quick access to your music. While this is generally beneficial, the accumulated cache can take up significant storage space on your device and might cause app performance issues. Deleting Apple Music cache can help free up space and resolve potential glitches. Here's a guide on how to clear Apple Music cache on iPhone, iPad, Mac, Windows, and Android devices.

Part 1. How to Clear Apple Music Cache on iPhone and iPad
Apple Music's cache can gradually occupy a significant amount of storage space on your iPhone or iPad, especially if you're frequently streaming or downloading Apple Music. It's necessary to delete Apple Music cache on iPhone or other iOS devices frequently.
However, Apple Music doesn't have a built-in "Clear Cache" feature on iPhones and iPads. And, there is no direct option in the iPhone's settings to clear cache data.
To clear cache and free up space used by Apple Music, you typically need to take alternative actions, including deleting and reinstalling the Music app or offloading the Music app. Follow these steps to do them respectively:
Delete and Reinstall the Apple Music App
Removing and reinstalling the Apple Music app is the most effective way to clear its cache. However, this process removes all stored data, including downloaded songs and albums. After reinstalling, you will need to re-download any offline content you want to keep.
Step 1. Go to the Settings app on your iPhone or iPad.
Step 2. Navigate to General > iPhone Storage. Scroll down and find Apple Music.
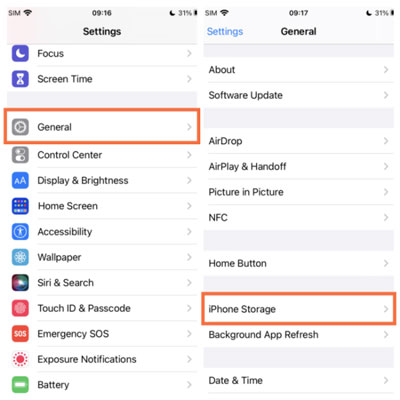
Step 3. Tap on Apple Music and select Delete App to clear cache on Apple Music on iPhone.
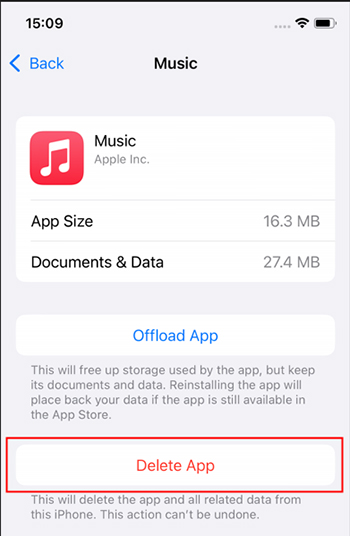
Step 4. Go to the App Store, search for Apple Music, and reinstall it on your iPhone or iPad.
Offload the Apple Music App
Offloading the Music app on an iPhone allows you to remove the app while keeping its data. When you reinstall the app, your data will be restored, but the Apple Music cache will be cleared.
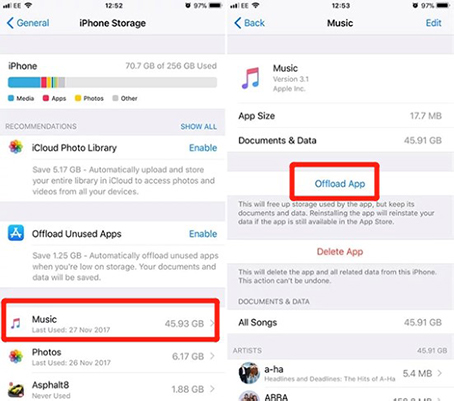
Step 1. Open the Settings app on your iPhone or iPad, and scroll down to choose General > iPhone Storage.
Step 2. Search for and tap the Music option and choose Offload App to clear cache on your iPhone but keep data.
Part 2. How to Clear Apple Music Cache on Mac
For Mac users, the cache generated by Apple Music can consume a noticeable amount of storage. If you find that the app is using too much space or running slowly, clearing the cache and preferences can be beneficial.
Apple Music does not provide a direct option within the app on Mac. But you can find the Apple Music cache files on your macOS computer and delete them manually. Here's how to do it:
Delete Apple Music Cache Files on Mac
Step 1. Open Finder and click on Go in the menu bar.
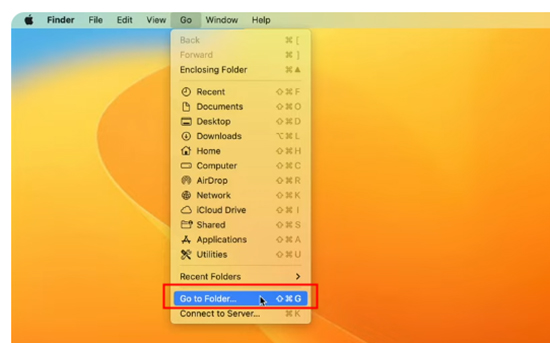
Step 2. Select Go to Folder and enter ~/Library/Caches/.

Step 3. Find and delete the folder named com.apple.iTunes on macOS Mojave and earlier or com.apple.Music on Mojave and earlier by clicking the Move to Trach option.

Part 3. How to Delete Apple Music Cache on Windows PC
Whether you're using iTunes on all Windows computers or the Apple Music app on Windows 11, cache data can accumulate over time, taking up valuable disk space. Clearing this cache can help optimize performance and free up storage. Here's how to clear the Apple Music cache on Windows PC:
Delete iTunes/Apple Music Cache on PC
Step 1. Launch the iTunes app and click the Edit > Preferences > Advanced option to find the iTunes Media Cache location.
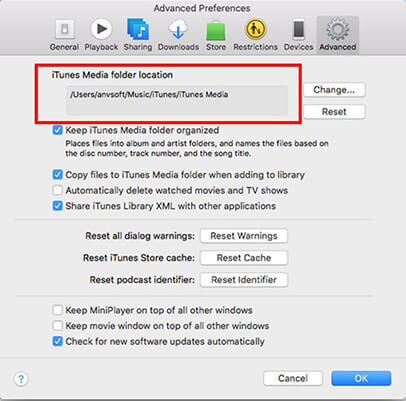
Step 2. Open File Explorer and go to C:\Users\[Your Username]\AppData\Local\Apple Computer\iTunes.
Step 3. Find and delete the iTunes Media Cache folder.
Note: For those using the Apple Music app on Windows 11, the cache is stored in a different location. Navigate to the Local folder within the AppData directory to access and clear these Apple Music cache files.
Part 4. How to Clear Cache on Apple Music on Android
Android users can experience similar cache buildup issues with Apple Music, leading to decreased performance and storage problems. Clearing the cache and, if necessary, the data can help improve the app's functionality.
Fortunately, Android provides a built-in Clear Cache feature in its settings app for all users. It's more straightforward to delete Apple Music cache on Android devices.
Clear Apple Music Cache in App Settings on Android
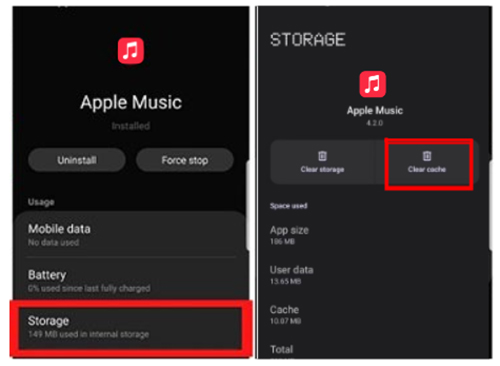
Step 1. Open the Settings app on your Android device, go to Apps and find Apple Music.
Step 2. Tap on Apple Music and then select Storage. Tap on Clear Cache option to delete cache on Apple Music.
Part 5. How to Clear Cache on Apple Music on Apple TV
For Apple TV users, managing cache is essential to maintaining smooth performance, especially when navigating and playing media. If you notice any lag or storage issues, follow these steps to clear the Apple Music cache:
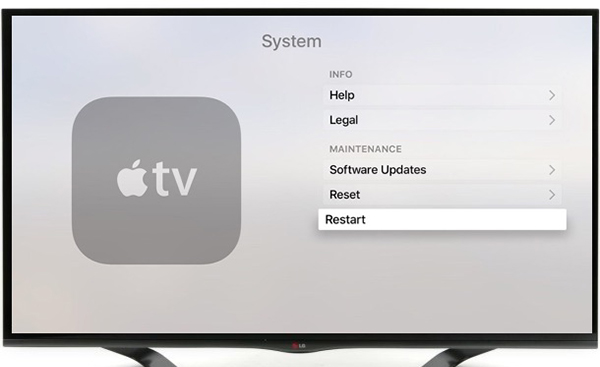
Restart Apple TV
Restarting the Apple TV can clear temporary cache data and resolve minor glitches. Go to Settings > System > Restart. Wait for the Apple TV to reboot.
Reinstall the Apple Music App
If restarting doesn't help, you may need to uninstall and reinstall the Apple Music app on Apple TV to clear its cache completely.
Step 1. From the Home screen, highlight the Apple Music app. Press and hold the touchpad or clickpad center until the app jiggles.
Step 2. Press the Play/Pause button and choose Delete to uninstall Apple Music on your Apple TV.
Step 3. Reinstall Apple Music on your Apple TV from the App Store.
Part 6. Additional Tips for Managing Apple Music Cache
Tip 1. Back up Apple Music to an External Hard Drive to Free up the Device
Some of the methods we mentioned to clear Apple Music cache will result in the loss of Apple Music library. Under this circumstance, it's highly recommended to back up Apple Music files to external hard drives, like USB flash drives, SD card, etc. before doing that.
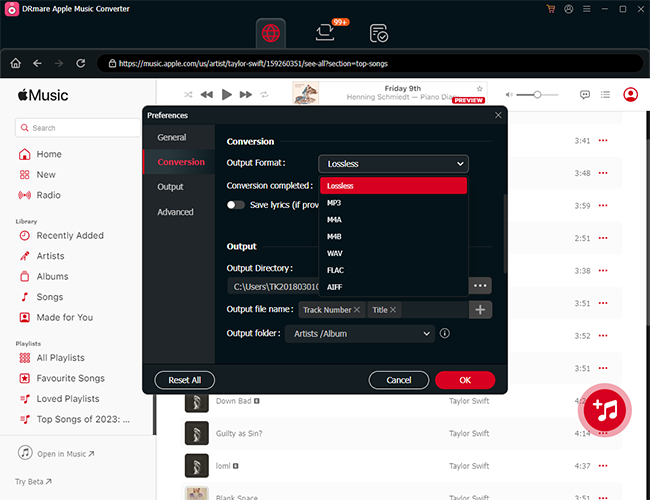
Since Apple Music is encrypted in DRM protection, you can draw support from DRmare Apple Music Converter to unlock this restriction with original audio quality preserved. With it, you can also convert Apple Music to plain audio formats, like MP3, FLAC, etc. at a faster conversion speed. Then, it's easy to transfer Apple Music downloads to USB flash drives, SD cards, and other hard drives by dragging&dropping action.
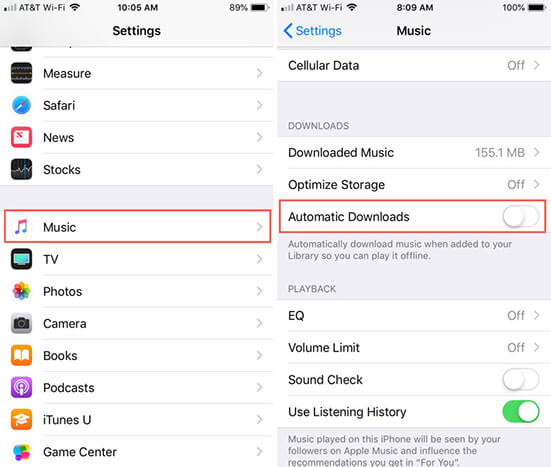
Tip 2. Enable Automatic Downloads to Reduce Apple Music Cache:
Enabling automatic downloads ensures that songs you add to your library are immediately stored on your device for offline use. This minimizes the need for constant streaming, which not only saves data but also reduces the cache buildup associated with repeated playback of the same tracks. With this setting enabled, you can listen to Apple Music offline, even without an internet connection.
Step 1. Go to Settings > Music > Automatic Downloads on your iPhone or iPad.
Step 2. Toggle on the switch next to Automatic Downloads. This setting will apply to all new songs you add to your library, automatically downloading them to your device.
Tip 3. Optimize Storage to Delete Apple Music Cache
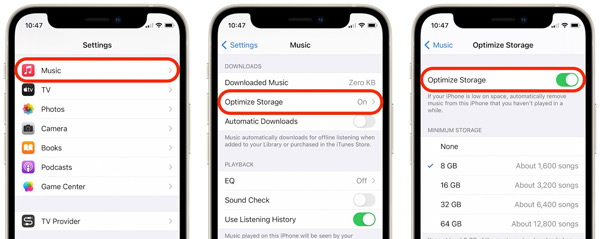
If you're running low on storage, Apple Music's Optimize Storage feature can be a lifesaver. When enabled, this setting will automatically delete songs you haven't played in a while, freeing up space without you having to manually manage your music collection.
This is especially useful for users with smaller storage capacities, as it helps maintain a healthy balance between available space and offline music.
Step 1. Go to Settings > Music > Optimize Storage.
Step 2. From here, you can choose a minimum storage limit, such as 4GB or 8GB. Apple Music will then automatically manage your downloads, keeping only the most recently played songs on your device.
Tip 4. Download High-Quality Audio Only to Limit Apple Music Cache:
Streaming lower quality audio files might seem like a good way to save data, but it can lead to more frequent reloading and caching of tracks, which can increase cache usage over time.
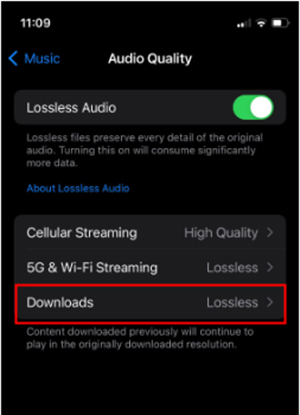
By choosing to download high-quality audio, you ensure that Apple Music stores a single, high-quality version of each song on your device. This reduces the need for the app to constantly adjust playback quality based on your connection, which can result in a cleaner, more stable cache.
Step 1. Go to Settings > Music > Audio Quality.
Step 2. Under Downloads, select High Quality or Lossless (if available). This will ensure that all downloaded music is of the highest quality possible, minimizing the need for additional caching.
Part 7. In Conclusion
By regularly clearing the Apple Music cache on your device, you can ensure smoother performance, more efficient use of storage space, and an overall better listening experience. While Apple doesn't offer a direct cache-clearing option within the app, the methods outlined in this article can effectively clear Apple Music cache on iPhone, iPad, Mac, Windows PC, Android devices, and even Apple TV.


User Comments
Leave a Comment